

Step-by-Step Radon Testing and Mitigation Process for Washington DC Homes
Radon is the leading cause of lung cancer in non-smokers, making it a critical environmental hazard for homeowners in the District of Columbia and surrounding areas. According to the EPA, radon testing is strongly encouraged for all properties, and landlords may be legally obligated to test for radon in their rental properties. The Building Sciences team at DMV Environmental provides fast and efficient radon testing in DC, Maryland, and Virginia to ensure your home is safe. This guide outlines the precise steps for testing and mitigating radon levels effectively. (Contact us Dmvenvironmental)
Understanding Radon and Local Risks
Radon is a colorless, odorless, and tasteless radioactive gas that originates from the natural decay of uranium in soil, rock, and water. It can seep into buildings through cracks and other openings in the foundation. Radon exposure is a serious health concern because prolonged inhalation of this gas increases the risk of lung cancer. In the Washington DC metropolitan area, soil conditions vary, leading to different levels of radon potential across neighborhoods. The EPA map indicates that while DC is in Zone 2 (moderate potential), specific local geology can create high-risk pockets. (About Dmvenvironmental)
DMV Environmental specializes in identifying these risks through professional inspections. Our certified inspectors are licensed to perform radon services in Maryland, DC, and Virginia. We understand that water intrusion and soil gas migration are interconnected issues. By addressing radon early, homeowners can prevent long-term health liabilities and maintain property value. Proactive management of indoor air quality is essential for maintaining a healthy living environment. (About Dmvenvironmental)
The Radon Testing Process
Testing for radon is the only way to know if your home has elevated levels. The process typically involves placing a detector in the lowest lived-in level of the home. There are two main types of tests: short-term and long-term. Short-term tests last from two days to ninety days, while long-term tests last for more than ninety days. The CDC recommends taking action if radon levels are 4 pCi/L or higher in air. (Services Dmvenvironmental)
Step 1: Preparation and Detector Placement
Before testing, homeowners should close windows and doors to maintain normal living conditions. The detector is placed in the lowest lived-in level, such as a basement or first floor. It should be located in a room that is used regularly, away from drafts, high humidity, and exterior walls. DMV Environmental offers professional testing services that ensure accurate placement and data collection. Our team uses continuous radon monitors for real-time data, providing immediate insights into gas levels.
Step 2: Data Collection and Analysis
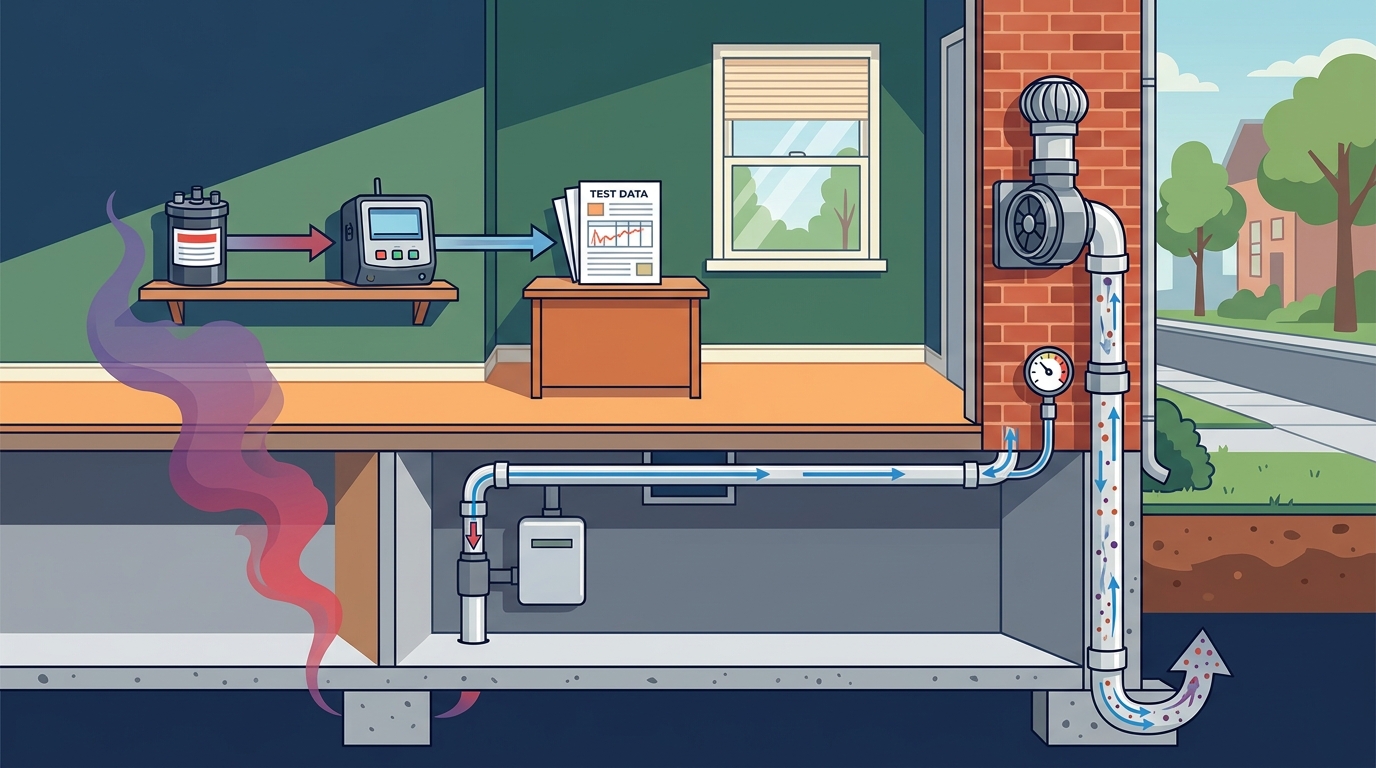
Once the detector is in place, it collects data for the specified period. After the test, the device is sent to a laboratory for analysis. The results are reported in picocuries per liter (pCi/L). If the level is 4 pCi/L or higher, mitigation is recommended. EPA guidelines state that levels between 2 and 4 pCi/L also warrant consideration for mitigation. DMV Environmental provides detailed reports that explain these results in plain language, helping homeowners make informed decisions.
Radon Mitigation System Installation
If testing reveals elevated radon levels, mitigation is necessary to reduce exposure. The most common and effective method is the installation of a sub-slab depressurization system. This system works by drawing radon gas from beneath the foundation and venting it safely above the roofline. Radon Mitigation Systems can be installed for as little as $3500, depending on the home's layout and foundation type. DMV Environmental’s dedicated team ensures fast and efficient installation to make your home safe quickly.
Step 1: System Design and Planning
A certified mitigator assesses the home to determine the best placement for the suction pipe and fan. The design considers the foundation type, such as slab-on-grade or basement. The goal is to create a uniform pressure differential beneath the slab. DMV Environmental’s Building Sciences team uses industry best practices to design systems that are both effective and aesthetically pleasing. We also consider existing HVAC systems to ensure they do not interfere with the mitigation process.
Step 2: Installation and Sealing
The installation involves drilling a hole through the foundation slab and inserting a PVC pipe. The pipe is sealed to the slab to prevent radon from escaping into the home. A fan is installed in the attic or outside the home to create suction. All cracks and openings in the foundation are sealed to enhance the system's efficiency. Industry standards require that the system operate continuously to maintain safe levels. DMV Environmental ensures all work meets or exceeds these regulatory requirements.
Post-Mitigation Verification
After installation, a re-test is conducted to verify that the system is working effectively. This test is typically a short-term test conducted for 48 hours to seven days. The goal is to confirm that radon levels have dropped below the action level of 4 pCi/L. If levels remain high, the system may need adjustments, such as increasing fan power or sealing additional cracks. DMV Environmental provides clearance inspections to ensure the mitigation system is performing as intended.
Regular monitoring is also recommended to ensure long-term effectiveness. Radon levels can change over time due to seasonal variations or structural changes in the home. The WHO notes that radon is a significant public health issue globally, emphasizing the need for ongoing vigilance. DMV Environmental offers maintenance plans to keep your mitigation system running optimally. Our team is available for emergency response services if any issues arise with the system.
Cost and Investment Analysis
Investing in radon mitigation is a cost-effective way to protect your family's health. The average cost of radon mitigation ranges from $800 to $2,500, but complex installations can cost more. DMV Environmental offers competitive pricing, with systems installed for as little as $3500. This investment is minimal compared to the potential medical costs associated with radon-induced lung cancer. Additionally, a radon mitigation system can increase the marketability of your home, as buyers increasingly prioritize indoor air quality.
| Service Component | Description | Estimated Cost Range |
|---|---|---|
| Radon Testing | Professional short-term or long-term testing | $150 - $400 |
| Mitigation System | Sub-slab depressurization installation | $800 - $2,500+ |
| Re-test | Post-mitigation verification | $150 - $300 |
| Maintenance | Annual system check and fan replacement | $100 - $200 |
Key Takeaways
- Radon is the leading cause of lung cancer in non-smokers, requiring immediate attention in DC homes.
- The EPA recommends testing for radon in both air and water, taking action if levels are above 4 pCi/L.
- DMV Environmental provides certified radon testing and mitigation services in DC, Maryland, and Virginia.
- Radon Mitigation Systems can be installed for as little as $3500, offering a cost-effective health solution.
- Post-mitigation re-testing is essential to verify the system's effectiveness and ensure safety.
- Landlords may be legally obligated to test for radon in their rental properties to comply with local regulations.
- Proactive radon management reduces liability and enhances the marketability of residential and commercial properties.
Frequently Asked Questions
How long does radon testing take?
Short-term tests last from two days to ninety days, while long-term tests last for more than ninety days. DMV Environmental offers both options to suit your needs.
What is the action level for radon?
The EPA action level is 4 pCi/L. If your test results are at or above this level, mitigation is recommended to reduce exposure.
Can I mitigate radon in a new home?
Yes, radon mitigation systems can be installed in new homes. It is often easier and less expensive to install the system during construction, but post-construction mitigation is also effective.
How often should I re-test for radon?
It is recommended to re-test every two years or after any major changes to the home's foundation or ventilation systems. DMV Environmental can schedule these re-tests for you.
Is radon mitigation expensive?
Radon mitigation costs vary, but systems can be installed for as little as $3500. This is a significant investment in health and property value.
Does radon affect water supply?
Yes, radon can enter homes through water, especially from private wells. DMV Environmental offers potable water quality and legionella testing to address these concerns.
Who can install a radon mitigation system?
Only certified radon mitigators should install these systems. DMV Environmental’s team is licensed and experienced in installing safe and effective mitigation systems in DC, Maryland, and Virginia.
Secure Your Home's Safety Today
Do not wait for radon to become a problem. Contact DMV Environmental today to schedule your radon testing and mitigation. Our team is dedicated to providing fast and efficient services to keep your home safe. Visit our Contact Us page or call (202) 710-2828 to get started. Protect your family and your investment with professional environmental services.